Wednesday, April 27, 2011
Quickie - Keyboard shortcuts, Kile
Just found another keyboard shortcut for Kile. When wanting to move between tabs, simply press and hold atl + the left or right arrows.

Tuesday, April 26, 2011
Quickie - Keyboard shortcuts
Ok, here is another shortcut that I "knew" about but at the same time didn't know about. I always wondered how some people could use the keyboard and not the mouse to do so many things on the computer, especially in document setting or any typing setting such as programming. Again, I feel lame for not knowing this. I know and use quite often keyboard shortcuts such as
cut, copy, and paste (crtl + x, c, v), save and save as (ctrl + s, ctrl-shift + s), and undo (ctrl + z),
but I finally figured out some selection tools,
ctrl + arrow (left or right)
will jump to the beginning of each word and
shift + the arrow keys (l or r)
will select and highlight each letter as you use the arrow keys. I know, simple and something I should have probably already known. However, I am sure some, like myself, were not aware or it has not been brought to their attention. So try it out and I encourage you to use keyboard shortcuts when ever possible. It allows for seamless typing so you don't have to stop and grab the mouse, line up the correct spot, etc. However, if you feel comfortable doing it your way and feel that it is faster, then of course do what feels best for you and of course using the mouse/touch pad is quicker in some situations. Just a suggestion, especially if you program or type a lot like myself. Some that I am sure programming/typing gurus use all the time. I am sure there are many other shortcuts that I will stumble upon later.
edit: I found another, told ya! To select the whole word and highlight it use
crtl-shift + left or right arrows
Another one:
crtl + backspace
will delete the whole word that ctrl + left arrow would have brought to the beginning or crtl-shift + arrow would have selected
cut, copy, and paste (crtl + x, c, v), save and save as (ctrl + s, ctrl-shift + s), and undo (ctrl + z),
but I finally figured out some selection tools,
ctrl + arrow (left or right)
will jump to the beginning of each word and
shift + the arrow keys (l or r)
will select and highlight each letter as you use the arrow keys. I know, simple and something I should have probably already known. However, I am sure some, like myself, were not aware or it has not been brought to their attention. So try it out and I encourage you to use keyboard shortcuts when ever possible. It allows for seamless typing so you don't have to stop and grab the mouse, line up the correct spot, etc. However, if you feel comfortable doing it your way and feel that it is faster, then of course do what feels best for you and of course using the mouse/touch pad is quicker in some situations. Just a suggestion, especially if you program or type a lot like myself. Some that I am sure programming/typing gurus use all the time. I am sure there are many other shortcuts that I will stumble upon later.
edit: I found another, told ya! To select the whole word and highlight it use
crtl-shift + left or right arrows
Another one:
crtl + backspace
will delete the whole word that ctrl + left arrow would have brought to the beginning or crtl-shift + arrow would have selected
Thursday, March 17, 2011
Quickie - PDFs - middle mouse button
Here's a quickie. Most may already know this, but I didn't so surely someone else doesn't, :P. When using a PDF reader (at least for Okular and Foxit) you can click the middle mouse button on the scroll bar and it will take you to that area of the PDF.
edit: This also works for any window in Ubuntu (and maybe for Windows too?). I feel lame that I didn't already know this, :P.
edit: This also works for any window in Ubuntu (and maybe for Windows too?). I feel lame that I didn't already know this, :P.
Wednesday, March 16, 2011
LaTeX - Placing a figure or image in a table
This is pretty cool, easy, and helpful. I have some tables that I took a snapshot of and made them images. However, in my thesis I want to display these "figures" as a table. I found out how to do it here. (Great blog that I have linked to and spoken about before on LaTeX.)
http://texblog.wordpress.com/2008/02/04/placing-graphicsimages-inside-a-table/
I will post my code and an image later.
http://texblog.wordpress.com/2008/02/04/placing-graphicsimages-inside-a-table/
I will post my code and an image later.
Grammar Rules: Apostrophes
Well, I thought I would list some grammar help/rules/tips and links since I will be writing most of my life from here on out as a scientist. Now science and I imagine other fields can bend/break rules since they are not writing a strict literature. It's kind of like novelist who can and have to write "non-perfect" grammar and writing styles or rules.
Anyways, this post is about apostrophes. I always forget if you need the 's for possession for a name that ends in s. I found out here
http://www.grammarbook.com/punctuation/apostro.asp
that the 's is not necessary but preferred. I will post more helpful links later.
Anyways, this post is about apostrophes. I always forget if you need the 's for possession for a name that ends in s. I found out here
http://www.grammarbook.com/punctuation/apostro.asp
that the 's is not necessary but preferred. I will post more helpful links later.
Friday, March 4, 2011
Some Quick Keyboard Shortcuts - Ubuntu, Okular, Foxit PDF Reader
Here is another quickie, ;). When looking at files in Ubuntu, I like to usually see them in list form since I am usually hunting down a PDF of a paper. Just hit Crtl+2 to quick view the list view.
In Okular, Kile's default PDF reader, which is pretty good I might add, hit F7 to toggle between viewing the sidebar or not. In Foxit hit F4.
In Okular, Kile's default PDF reader, which is pretty good I might add, hit F7 to toggle between viewing the sidebar or not. In Foxit hit F4.
Kile - Moving File Tabs
Ahhhh, finally. I always thought it would be nice if you could move the tab files around since I like them in a certain order sometimes. I thought for sure there was a way to do it but haven't found it....until now!! Simply click and hold the middle mouse button, and viola, the tabs can be moved by scrolling to the left or right!!
Tuesday, February 8, 2011
Update on Kile and Texmaker (and some TeXworks)
Alright, well I tried running Texmaker on my old laptop last night and was having trouble, probably due to my laptop. Anyways I keep getting drawn back to Kile, so I think I will move between both. I will probably stay on Kile when on Ubuntu and use Texmaker when I have to use Windows.
So one feature about Kile I really like, is its find and replace abilities. I didn't really like TeXworks or Winedt's find features. TeXworks is ok, but Kile's is quite nice, and IMO, blows the others out of the water.
Kile's find feature:

Well I just found out with a quick test that Texmaker's is just as good. Both Kile and Texmaker make it seamless to quickly find words with an on the fly popup menu while TeXworks and Winedt made it painful where you had to keep hitting crtl+f!
Texmaker's find feature:

Ok, just got burned. I just tested TeXworks again for a screenshot, and I noticed that there is an option for "Find all places" or something like that. It also has a dropmenu for previous searches. So TeXworks seems to be maybe just a notch under Kile and Texmaker. I also imagine that Winedt has a similar feature that I missed too.


So as of right now, to me, Kile and Texmaker seem to be the best LaTeX editors for Ubuntu/Linux where Texmaker is cross-platform so I would use it for Windows. They both have a few better features than the others, but otherwise are pretty equal.
So one feature about Kile I really like, is its find and replace abilities. I didn't really like TeXworks or Winedt's find features. TeXworks is ok, but Kile's is quite nice, and IMO, blows the others out of the water.
Kile's find feature:

Well I just found out with a quick test that Texmaker's is just as good. Both Kile and Texmaker make it seamless to quickly find words with an on the fly popup menu while TeXworks and Winedt made it painful where you had to keep hitting crtl+f!
Texmaker's find feature:

Ok, just got burned. I just tested TeXworks again for a screenshot, and I noticed that there is an option for "Find all places" or something like that. It also has a dropmenu for previous searches. So TeXworks seems to be maybe just a notch under Kile and Texmaker. I also imagine that Winedt has a similar feature that I missed too.


So as of right now, to me, Kile and Texmaker seem to be the best LaTeX editors for Ubuntu/Linux where Texmaker is cross-platform so I would use it for Windows. They both have a few better features than the others, but otherwise are pretty equal.
More on LaTeX editors: TeXworks, Texmaker, Kile, GEdit-LaTeX, Vim-LaTeX, TEA Text Editor, LaTeXila, and Winefish
Whelp, here I am again, debating on what LaTeX editor to use, :P. I think I am going to try Texmaker out again. The reason I am switching is that (not sure if was TeXworks itself, but I was using it so I am going to blame it, :P) I opened chapter 2 of my thesis and got a bunch of junk! I don't know wth happened, but it looked like it had become corrupted. It looked as if a log file was saved instead of my work. Luckily, most LaTeX editors have backups of everything. However, the latest backup TeXworks had wasn't the latest I know I had completed and saved!! Luckily, I hadn't done much to the chapter so it will be easily fixed.
Thus, I am irritated with TeXworks so I am going to try Texmaker again. The reason why I am trying Texmaker and not Kile is the fact that Texmaker is cross-platform. A few things I have noticed since using Texmaker again. One, is that I think my issue with the syntax coloring has partly to do with the type of font. So I am going to experiment with fonts to see how they please my eyes. However, Texmaker does not let you preview fonts like Kile, a con.

Here are some pics on Texmaker's font and syntax coloring and Kile's syntax coloring.


Another small thing that I don't like about Texmaker as compared to Kile and TeXworks is that in Texmaker you have to open up files one by one. You cannot select more than one file at a time while in Kile and others like TeXworks you can.
Also, when scrolling through the tabs in TeXmaker, you cannot scroll through the last tab into the first again for a cycle while in Kile you can. Heh, I may be switching to Kile again! Oh well, a learning process
A few more editors to possibly try are Linux/Ubuntu's GEdit (text editor). It has a LaTeX plug-in. There is also a similar software/program/text editor to Emacs called Vi/Vim which stands for Vi Improved. A few more in Ubuntu's software repositories are TEA Text Editor, LaTeXila, and Winefish.
One note about Vim and Emacs is that they are designed for optimizing keyboard use. They maximize time spent using the keyboard with tons of shortcut commands.
http://projects.gnome.org/gedit/
http://www.vim.org/
http://vim-latex.sourceforge.net/
http://winefish.berlios.de/
http://tea-editor.sourceforge.net/
http://latexila.sourceforge.net/
A few discussions I found through Google over LaTeX editors.
http://ubuntuforums.org/showthread.php?t=793738
http://stackoverflow.com/questions/1235043/what-latex-editor-do-you-suggest-for-linux
http://www.latex-community.org/forum/viewtopic.php?f=41&t=9151
http://ubuntuforums.org/showthread.php?t=486126
http://www.ubuntugeek.com/gummi-simple-latex-editor-written-in-pythongtk.html
http://www.ubuntu-virginia.ubuntuforums.org/showthread.php?t=1559670
http://askubuntu.com/questions/501/whats-the-easiest-way-to-get-started-with-latex
Best editor for Debian. - http://www.latex-community.org/forum/viewtopic.php?f=28&t=9033&start=0
Here is a great in-depth blog post that reviews some LaTeX editors. Has some cool animated pictures!!
http://www.charlietanksley.net/philtex/editors/
Thus, I am irritated with TeXworks so I am going to try Texmaker again. The reason why I am trying Texmaker and not Kile is the fact that Texmaker is cross-platform. A few things I have noticed since using Texmaker again. One, is that I think my issue with the syntax coloring has partly to do with the type of font. So I am going to experiment with fonts to see how they please my eyes. However, Texmaker does not let you preview fonts like Kile, a con.

Here are some pics on Texmaker's font and syntax coloring and Kile's syntax coloring.


Another small thing that I don't like about Texmaker as compared to Kile and TeXworks is that in Texmaker you have to open up files one by one. You cannot select more than one file at a time while in Kile and others like TeXworks you can.
Also, when scrolling through the tabs in TeXmaker, you cannot scroll through the last tab into the first again for a cycle while in Kile you can. Heh, I may be switching to Kile again! Oh well, a learning process
A few more editors to possibly try are Linux/Ubuntu's GEdit (text editor). It has a LaTeX plug-in. There is also a similar software/program/text editor to Emacs called Vi/Vim which stands for Vi Improved. A few more in Ubuntu's software repositories are TEA Text Editor, LaTeXila, and Winefish.
One note about Vim and Emacs is that they are designed for optimizing keyboard use. They maximize time spent using the keyboard with tons of shortcut commands.
http://projects.gnome.org/gedit/
http://www.vim.org/
http://vim-latex.sourceforge.net/
http://winefish.berlios.de/
http://tea-editor.sourceforge.net/
http://latexila.sourceforge.net/
A few discussions I found through Google over LaTeX editors.
http://ubuntuforums.org/showthread.php?t=793738
http://stackoverflow.com/questions/1235043/what-latex-editor-do-you-suggest-for-linux
http://www.latex-community.org/forum/viewtopic.php?f=41&t=9151
http://ubuntuforums.org/showthread.php?t=486126
http://www.ubuntugeek.com/gummi-simple-latex-editor-written-in-pythongtk.html
http://www.ubuntu-virginia.ubuntuforums.org/showthread.php?t=1559670
http://askubuntu.com/questions/501/whats-the-easiest-way-to-get-started-with-latex
Best editor for Debian. - http://www.latex-community.org/forum/viewtopic.php?f=28&t=9033&start=0
Here is a great in-depth blog post that reviews some LaTeX editors. Has some cool animated pictures!!
http://www.charlietanksley.net/philtex/editors/
Friday, February 4, 2011
Linux/Ubuntu Directory Structure
I thought this was interesting and helpful so I decided to repost it. It is from 2006, but I think it is still valid.
http://www.ubuntugeek.com/linux-or-ubuntu-directory-structure.html
In the Linux operating system, all filesystems are contained within one directory hierarchy. The root directory is the top level directory, and all its subdirectories make up the directory hierarchy. This differs to other operating systems such as MS-Windows which applies a separate hierarchy for each device and partition.
/bin - binary applications (most of your executable files)
/boot - files required to boot (such as the kernel, etc)
/dev - your devices (everything from drives to displays)
/etc - just about every configuration file for your system
/etc/profile.d - contains scripts that are run by /etc/profile upon login.
/etc/rc.d - contains a number of shell scripts that are run on bootup at different run levels. There is also typically an rc.inet1 script to set up networking (in Slackwar), an rc.modules script to load modular device drivers, and an rc.local script that can be edited to run commands desired by the administrator, along the lines of autoexec.bat in DOS.
/etc/rc.d/init.d - contains most of the initialization scripts themselves on an rpm-based system.
/etc/rc.d/rc*.d - where “*” is a number corresponding to the default run level. Contains files for services to be started and stopped at that run level. On rpm-based systems, these files are symbolic links to the initialization scripts themselves, which are in /etc/rc.d/init.d.
/etc/skel - directory containing several example or skeleton initialization shells. Often contains subdirectories and files used to populate a new user’s home directory.
/etc/X11 - configuration files for the X Window system
/home - locally stored user files and folders
/lib - system libraries (similar to Program Files)
/lost+found - lost and found for lost files
/media - mounted (or loaded) devices such as cdroms, digital cameras, etc.
/mnt - mounted file systems
/opt - location for “optionally” installed programs
/proc - dynamic directory including information about and listing of processes
/root - “home” folder for the root user
/sbin - system-only binaries (see /bin)
/sys - contains information about the system
/tmp - temporary files
/usr - applications mainly for regular users
/var - mainly logs, databases, etc.
/usr/local/bin - the place to put your own programs. They will not be overwritten with upgrades.
/usr/share/doc - documentation.
http://www.ubuntugeek.com/linux-or-ubuntu-directory-structure.html
In the Linux operating system, all filesystems are contained within one directory hierarchy. The root directory is the top level directory, and all its subdirectories make up the directory hierarchy. This differs to other operating systems such as MS-Windows which applies a separate hierarchy for each device and partition.
/bin - binary applications (most of your executable files)
/boot - files required to boot (such as the kernel, etc)
/dev - your devices (everything from drives to displays)
/etc - just about every configuration file for your system
/etc/profile.d - contains scripts that are run by /etc/profile upon login.
/etc/rc.d - contains a number of shell scripts that are run on bootup at different run levels. There is also typically an rc.inet1 script to set up networking (in Slackwar), an rc.modules script to load modular device drivers, and an rc.local script that can be edited to run commands desired by the administrator, along the lines of autoexec.bat in DOS.
/etc/rc.d/init.d - contains most of the initialization scripts themselves on an rpm-based system.
/etc/rc.d/rc*.d - where “*” is a number corresponding to the default run level. Contains files for services to be started and stopped at that run level. On rpm-based systems, these files are symbolic links to the initialization scripts themselves, which are in /etc/rc.d/init.d.
/etc/skel - directory containing several example or skeleton initialization shells. Often contains subdirectories and files used to populate a new user’s home directory.
/etc/X11 - configuration files for the X Window system
/home - locally stored user files and folders
/lib - system libraries (similar to Program Files)
/lost+found - lost and found for lost files
/media - mounted (or loaded) devices such as cdroms, digital cameras, etc.
/mnt - mounted file systems
/opt - location for “optionally” installed programs
/proc - dynamic directory including information about and listing of processes
/root - “home” folder for the root user
/sbin - system-only binaries (see /bin)
/sys - contains information about the system
/tmp - temporary files
/usr - applications mainly for regular users
/var - mainly logs, databases, etc.
/usr/local/bin - the place to put your own programs. They will not be overwritten with upgrades.
/usr/share/doc - documentation.
Finding the .config folder in Ubuntu
The ~/.config folder can be found in your homefolder and will be named what ever you called it (I guess the login name). Mine for example is timbarber/.config since that is my login name. You will also have to click on "Show Hidden Files" under the View menu. It took me awhile to find this with Google so that is why I am posting it! Also, it is needed to find the ~/.config/inkscape/extensions folder to deposit the two Tex Text files.
More on TeXworks
A few things I have noticed about TeXworks since I have started using it. One, you cannot tab your files together as in Kile and Texmaker. This can be a little annoying if you have several files to work with and end up with a bunch of open windows on your OS system bar. This doesn't bother me enough to switch back at the moment. Second, there are no keyboard shortcuts that I am aware of for quick typing such as a math environment (such as, I think it is crtl+atl m for Kile and ctrl+shft m for Texmaker, I may have those backwards). Kile also does offer the nice amenity of auto-completion of words and environments (not sure if Texmaker had this or not, I think it auto-completes environments). Finally, it seems that in TeXworks when an error appears, you correct it, and try to re-run the file, TeXworks gets "stuck" so you have to clear the auxiliary files (such as .toc, .aux, etc.). Not a big deal, but I originally though you had to clear by hand, but luckily TeXworks has a command under the File menu to do this. A little annoying since it erases the memory of the bibliography and cross-references so you might have to run pdflatex two or three times.
I googled something like "keyboard shorcuts for math environment in TeXworks" and found a log/forum of some people asking for this to be implemented in TeXworks. Looks like a patch is here and could work. I haven't tried it yet. Have at it:
http://code.google.com/p/texworks/issues/detail?id=17
I googled something like "keyboard shorcuts for math environment in TeXworks" and found a log/forum of some people asking for this to be implemented in TeXworks. Looks like a patch is here and could work. I haven't tried it yet. Have at it:
http://code.google.com/p/texworks/issues/detail?id=17
Tuesday, February 1, 2011
LaTeX - TeXworks, Kile, Texmaker, and others such as GNU Emacs & AUCTeX, LyX, and GNU TeXmacs
I am still experimenting with several LaTeX software and editors. So far I have tried Texmaker and Kile extensively. They are both pretty good, but not the best. One thing I don't like with either is the syntax coloring (it may have better color available, but I haven't found it yet; I think there is an option to change colors, but I am not sure how much it improves with Kile or Texmaker). To me it is harder to read the less colorful syntax highlighting of Kile and Texmaker. However, Kile is a little better syntax coloring-wise than Texmaker, and Kile also has a few better features (it's been awhile since I have used Texmaker so I don't remember the differences, I just like the layout of Kile better than Texmaker).
However, I have recently tried TeXworks, and so far it is much more simple than Texmaker or Kile. TeXworks seems to have much better syntax coloring, and it is an easy option to find and turn on or off. It also recently helped me catch an error that TeXworks nor Kile could catch. TeXworks it also cross platform so it works for Windows, Mac, and Linux. This is especially helpful since I just had to use a Windows machine and use Winedt (as a frontend and MikTeX as the TeX compiler), which has only a free-trial for 30 days that I just found out about.
One good thing about Kile and Texmaker is that they will restore an old session so you don't have to re-open everything like you do in TeXworks. Texmaker has an "Restore Previous Session" selection under the File menu. However, only after you have opened up files before and closed Texmaker without closing the files. Kile does the same except it does it automatically when the program is opened.
Anyways, TeXworks (as a frontend and TeXlive as the compiler) is what I am going to be trying out for now. Really, Texmaker and Kile are not bad at all. It is just more of a personal preference for cross platform and aesthetics.
I have also been attempting to use Emacs and AUCTeX or GNU TeXmacs editor. Right now, Emacs is a little scary looking (not enough GUI for me), and GNU TeXmacs seems to be a LaTeX frontend similar to LyX. I will try to update more on these later as from what I hear learning Emacs can be quite powerful.
Shots of TeXworks (click to enlarge a bit):


Shots of Kile and Okular:


Shots of Texmaker:


Link to AUCTeX documentation: http://www.gnu.org/software/auctex/manual/auctex.pdf
Link to TeXworks documentation: http://ftp.ctex.org/pub/tex/tools/editors/TeXworks/manual.pdf
Link to GNU Emacs: http://www.gnu.org/software/emacs/
Link to GNU TeXmacs: http://www.texmacs.org/
Link to LyX: http://www.lyx.org/
Link to Texmaker: http://www.xm1math.net/texmaker/
Link to TeXworks: http://www.tug.org/texworks/
Link to Kile: http://kile.sourceforge.net/
However, I have recently tried TeXworks, and so far it is much more simple than Texmaker or Kile. TeXworks seems to have much better syntax coloring, and it is an easy option to find and turn on or off. It also recently helped me catch an error that TeXworks nor Kile could catch. TeXworks it also cross platform so it works for Windows, Mac, and Linux. This is especially helpful since I just had to use a Windows machine and use Winedt (as a frontend and MikTeX as the TeX compiler), which has only a free-trial for 30 days that I just found out about.
One good thing about Kile and Texmaker is that they will restore an old session so you don't have to re-open everything like you do in TeXworks. Texmaker has an "Restore Previous Session" selection under the File menu. However, only after you have opened up files before and closed Texmaker without closing the files. Kile does the same except it does it automatically when the program is opened.
Anyways, TeXworks (as a frontend and TeXlive as the compiler) is what I am going to be trying out for now. Really, Texmaker and Kile are not bad at all. It is just more of a personal preference for cross platform and aesthetics.
I have also been attempting to use Emacs and AUCTeX or GNU TeXmacs editor. Right now, Emacs is a little scary looking (not enough GUI for me), and GNU TeXmacs seems to be a LaTeX frontend similar to LyX. I will try to update more on these later as from what I hear learning Emacs can be quite powerful.
Shots of TeXworks (click to enlarge a bit):


Shots of Kile and Okular:


Shots of Texmaker:


Link to AUCTeX documentation: http://www.gnu.org/software/auctex/manual/auctex.pdf
Link to TeXworks documentation: http://ftp.ctex.org/pub/tex/tools/editors/TeXworks/manual.pdf
Link to GNU Emacs: http://www.gnu.org/software/emacs/
Link to GNU TeXmacs: http://www.texmacs.org/
Link to LyX: http://www.lyx.org/
Link to Texmaker: http://www.xm1math.net/texmaker/
Link to TeXworks: http://www.tug.org/texworks/
Link to Kile: http://kile.sourceforge.net/
Sunday, January 30, 2011
LaTeX: Errors
Here is a webpage I found that has helpful LaTeX or TeX errors (the common errors, I suppose), and what they usually refer to.
Mysterious TeX Errors: http://www.tug.org/errors.html
Edit/Update: 7-7-11
I thought I had linked this page before. Here is a list of error classes. This list provides the error message, it's class, and the cause of the error. Two tables, one for ambiguous errors and the other for common errors.
Latex Error Classes - http://www.cs.utexas.edu/~witchel/errorclasses.html
Mysterious TeX Errors: http://www.tug.org/errors.html
Edit/Update: 7-7-11
I thought I had linked this page before. Here is a list of error classes. This list provides the error message, it's class, and the cause of the error. Two tables, one for ambiguous errors and the other for common errors.
Latex Error Classes - http://www.cs.utexas.edu/~witchel/errorclasses.html
LaTeX - Formatting & the command \newline (especially for tables)
Here is a great link to the Wikibooks site for LaTeX - Formatting. This is a great source for general things in LaTex such as quotes, font styles, symbols, paragraph formatting, lists, footnotes, etc.
Another formatting page that might be helpful:
http://pangea.stanford.edu/computing/unix/formatting/latexexample.php
Now, to the second part of the post. I had a hell of a time formatting a table in my thesis. Well, I hadn't really looked at tables so this was my first go. As you can see there are a myriad of help sites out there. However, I was looking for a simple command to start a new line in a cell of the table. We all know that the double-slash \\ works in paragraph or heading formatting. However, in tables it begins a new row. For some reason, I couldn't find what I was looking for, until I found it here:
http://tex.stackexchange.com/questions/3748/in-cell-newlines-in-tabular-environments.
(edit: If you are familiar with LaTeX then you probably already know this, but there is usually several ways to do something in LaTeX. This is the beauty of it, so independent and free. Anways, there were several ways to do the newline thing I was looking for (i.e. i tried to do a list, :/), but they all seemed too convoluted for the simple task I was looking for.)
Of course the command was simple and straightforward, I was just thrown off by all the other table formatting stuff out there. The command is \newline, and it works great and was exactly what I was looking for. So for anyone else who had the same trouble as me here it is.
Here is the link to the main webpage I was on. It is a Q&A for TeX, LaTeX, ConTeXt, and related typesetting systems.
http://tex.stackexchange.com/

Another formatting page that might be helpful:
http://pangea.stanford.edu/computing/unix/formatting/latexexample.php
Now, to the second part of the post. I had a hell of a time formatting a table in my thesis. Well, I hadn't really looked at tables so this was my first go. As you can see there are a myriad of help sites out there. However, I was looking for a simple command to start a new line in a cell of the table. We all know that the double-slash \\ works in paragraph or heading formatting. However, in tables it begins a new row. For some reason, I couldn't find what I was looking for, until I found it here:
http://tex.stackexchange.com/questions/3748/in-cell-newlines-in-tabular-environments.
(edit: If you are familiar with LaTeX then you probably already know this, but there is usually several ways to do something in LaTeX. This is the beauty of it, so independent and free. Anways, there were several ways to do the newline thing I was looking for (i.e. i tried to do a list, :/), but they all seemed too convoluted for the simple task I was looking for.)
Of course the command was simple and straightforward, I was just thrown off by all the other table formatting stuff out there. The command is \newline, and it works great and was exactly what I was looking for. So for anyone else who had the same trouble as me here it is.
Here is the link to the main webpage I was on. It is a Q&A for TeX, LaTeX, ConTeXt, and related typesetting systems.
http://tex.stackexchange.com/

Saturday, January 29, 2011
LaTeX: Tables
Here are some helpful places for tables in LaTex.
http://en.wikibooks.org/wiki/LaTeX/Tables
http://www.tug.org/TUGboat/Articles/tb28-3/tb90hoeppner.pdf
http://www.tug.org/pracjourn/2007-1/mori/mori.pdf
http://www.maths.leeds.ac.uk/latex/TableHelp1.pdf
http://www.andy-roberts.net/misc/latex/latextutorial4.html
http://nepsweb.co.uk/docs/tableTricks.pdf
https://www.msu.edu/~harris41/latex_tablespacing.html
Figures and Tables document from MIT:
http://web.mit.edu/rsi/www/pdfs/fig-intro.pdf
longtable package document:
ftp://ftp.tex.ac.uk/tex-archive/macros/latex/required/tools/longtable.pdf
A good blog post with many helpful comments for longtables:
http://fczaja.blogspot.com/2007/04/longtable-latex.html
A longtable example:
http://users.sdsc.edu/~ssmallen/latex/longtable.html
Another longtable example and some tips:
http://www.astro.psu.edu/gradinfo/psuthesis/longtable.html
A document over the supertabular environment:
http://www.cs.brown.edu/system/software/latex/doc/supertabular.pdf
Here ia a nice page by Reed College for Lists and Tables:
http://www.reed.edu/cis/help/latex/ListsTables.html

AH, a GREAT blog that I've used before: http://texblog.wordpress.com/
for some table help: http://texblog.wordpress.com/2008/05/04/equal-cell-width-in-latex-tables/

Saturday, January 22, 2011
Detexify - An Online LaTeX Symbol Generator
Ok, stealing another from fellow blog Please Make a Note who in turn reposted it from another fellow blog Walking Randomly :P, but this needs to be shared with as many as possible, :)! There is an online program or site called Detexify. Ever needed a symbol in LaTeX but can't find it or don't want to browse for it, then Detexify is for you. Simply go to the site, write the symbol you're looking for into the box, and Detexify returns several options depending upon the match. Try it out here -> Detexify http://detexify.kirelabs.org/classify.html
Reposted from:
Saad, T. "LaTeX Symbols - Detexify". Weblog entry from Please Make A Note. http://pleasemakeanote.blogspot.com/2010/07/latex-symbols-detexify.html
Edit/Update: 7-6-11
I saw this as a smartphone app the other day. Not sure if it was on Android or iOS or could be both. Check it out!!
Reposted from:
Saad, T. "LaTeX Symbols - Detexify". Weblog entry from Please Make A Note. http://pleasemakeanote.blogspot.com/2010/07/latex-symbols-detexify.html
Edit/Update: 7-6-11
I saw this as a smartphone app the other day. Not sure if it was on Android or iOS or could be both. Check it out!!
Friday, January 21, 2011
LaTeX - Having a section level underneath \subsubsection
Ah, wow, I found this on fellow blog Please Make a Note. I was wondering if you could have a section underneath the level of \subsubsection, and it turns out you can (numbered or not). I was simply just making the text bold and/or italic to set it off as a separate subsubsubsection in LaTeX. Apparently, the \paragraph is the level under \subsubsection and \subparagraph under that. To number use
\setcounter{secnumdepth}{5}
Then the levels are as follows:
\section{} % level 1
\subsection{} % level 2
\subsubsection{} % level 3
\paragraph{} % level 4 - equivalent to subsubsubsection
\subparagraph{} % level 5
Taken from:
Saad, T. "How to Activate \subsubsubsection in LaTeX". Weblog entry from Please Make A Note. http://pleasemakeanote.blogspot.com/2010/06/how-to-activate-subsubsubsection-in.html
\setcounter{secnumdepth}{5}
Then the levels are as follows:
\section{} % level 1
\subsection{} % level 2
\subsubsection{} % level 3
\paragraph{} % level 4 - equivalent to subsubsubsection
\subparagraph{} % level 5
Taken from:
Saad, T. "How to Activate \subsubsubsection in LaTeX". Weblog entry from Please Make A Note. http://pleasemakeanote.blogspot.com/2010/06/how-to-activate-subsubsubsection-in.html
Quickie: Kile LaTeX Editor - Shortcut for commenting
Ok this is something real quick, and I had a hard time finding for some reason. Every now and then when trying to save in Kile by pressing Ctrl+S I would accidentally hit something else and comment the line, which is a nice trick/shortcut to know but I couldn't figure out what I had hit. It is in fact Ctrl+D. To uncomment press Ctrl+Shft+D.
Wednesday, January 19, 2011
LaTeX Error: \@citex \include{file-name}
Ok, so I have been working on my thesis in LaTeX, and I was getting this error in my code. I knew where it was (the file-name, mine in this case was {back-matter-appendix-5} or something like that. I found out from this nice blog:
http://ergodicthoughts.blogspot.com/2010/03/latex-file-ended-while-scanning-use-of.html
that the error pertains to a wrong bracket placement or type. However, I couldn't find it! The error linked me to a random line in the code. After searching, I finally found it at the bottom, and yup it was a citation without a closed bracket!!
Check out the rest of the blog where I found that nice tip.
http://ergodicthoughts.blogspot.com/
http://ergodicthoughts.blogspot.com/2010/03/latex-file-ended-while-scanning-use-of.html
that the error pertains to a wrong bracket placement or type. However, I couldn't find it! The error linked me to a random line in the code. After searching, I finally found it at the bottom, and yup it was a citation without a closed bracket!!
Check out the rest of the blog where I found that nice tip.
http://ergodicthoughts.blogspot.com/
Tuesday, December 21, 2010
Blogger Tips: Readability and Post Width
Alright well I am slowly cleaning up my blog, and I have started to notice how ugly and hard to read it was. Appearance is everything for things like this because you want people to stop and check your blog out. Usually people have googled something and are quickly scanning pages (this is what I do) so you want something to capture your reader which is easy to read and aesthetically pleasing.
First I have changed my font color and post background color. To me, from what I have mentally gathered, a dark font with a light background or vice-versa works best. I personally like a darker font with a lighter background. This all can be changed easily in the Design Tab in Blogger.
Screenshot from my blog: I guess if you are reading this it probably looks the same, :P.

I had something like this before. It was a darker grey with a yellow tinged font. Not very easy to read...

This one is better, but I think, IMO, it is better not to get too fancy.

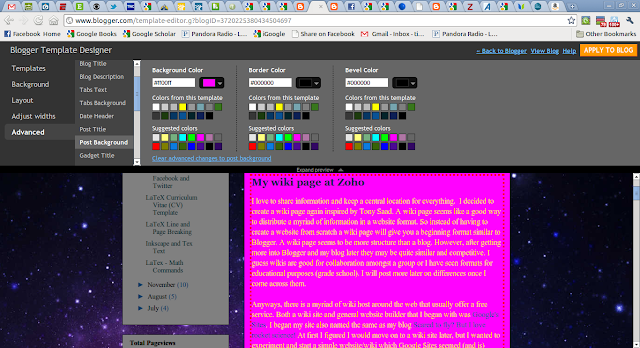
And please don't do something like this...it looks like a 14 y/o girl's MySpace or Xanga (sorry, no offense, just not professional). Seriously, I saw a PhD student who was applying for a professorship at my school who presented his equations in this color in a font size of 8...really?
Next I changed the layout. I have a blog archive as one of my gadgets on the sidebar like most people do (it seems pretty standard, and you can see mine in the images and probably now of course). However, I first had the archive gadget in a small width gadget space which crammed it and made it ugly and unreadable.


Also, it is nice to use a decent size font. Right now I am using Times Roman at an 16pt. I think in my format it is the perfect size. It is big enough, but not distorted like 18 or above.
Anyways, this post was supposed to be about how to widen your post. I thought changing to the one column format helped a lot. However, I went to the Design tab and under Edit HTML couldn't really follow this blog tip (John Deere Mom: How to widen your columns on Blogger) :


I am going to post some links and screenshots of some examples of what I am talking about. Here is the link again to the one I just mentioned:
John Deere Mom: How to widen your columns on Blogger
See (image above) how she has a simple white background with a black font color. Font is nice a big, very readable. She also has a nice blend of her post area and gadget area. I think this is due to the Design Template. I use the Awesome, Inc.

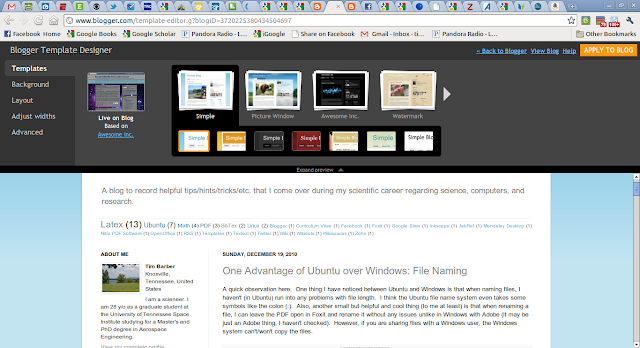
Here is the Simple:
She also has some (it looks) customized stuff which I haven't gotten to yet but will post about when I get there.
This is a screenshot of Please Make a Note.

Tony also has a very nice layout. Good font, background contrast. Very readable. He also has some nice customized stuff. I also noticed his tab at the top on the internet browser has a blue sphere instead of the Blogger emblem. Got to figure out that trick!!
Well, I just found the adjust width tab under the Design tab. Geez, it couldn't have been any more obvious. Haha, oh man, maybe it's new?? Anyways here are some screenshots:


First I have changed my font color and post background color. To me, from what I have mentally gathered, a dark font with a light background or vice-versa works best. I personally like a darker font with a lighter background. This all can be changed easily in the Design Tab in Blogger.
Screenshot from my blog: I guess if you are reading this it probably looks the same, :P.

I had something like this before. It was a darker grey with a yellow tinged font. Not very easy to read...

This one is better, but I think, IMO, it is better not to get too fancy.

And please don't do something like this...it looks like a 14 y/o girl's MySpace or Xanga (sorry, no offense, just not professional). Seriously, I saw a PhD student who was applying for a professorship at my school who presented his equations in this color in a font size of 8...really?

Next I changed the layout. I have a blog archive as one of my gadgets on the sidebar like most people do (it seems pretty standard, and you can see mine in the images and probably now of course). However, I first had the archive gadget in a small width gadget space which crammed it and made it ugly and unreadable.


So I finally figured out you could move the gadget to a wider gadget space in the layout design tab. I also had columns on both sides of the post, but I found it is better if you have one column on one side because it will increase the width of your post area. Also, I like the column on the left because I like to use X-Large picture formats and they spill over on the right side of the site. Even though I figured out you (reader) can click on the image and it will enlarge.


Also, it is nice to use a decent size font. Right now I am using Times Roman at an 16pt. I think in my format it is the perfect size. It is big enough, but not distorted like 18 or above.
Anyways, this post was supposed to be about how to widen your post. I thought changing to the one column format helped a lot. However, I went to the Design tab and under Edit HTML couldn't really follow this blog tip (John Deere Mom: How to widen your columns on Blogger) :


I am going to post some links and screenshots of some examples of what I am talking about. Here is the link again to the one I just mentioned:
John Deere Mom: How to widen your columns on Blogger
See (image above) how she has a simple white background with a black font color. Font is nice a big, very readable. She also has a nice blend of her post area and gadget area. I think this is due to the Design Template. I use the Awesome, Inc.

Here is the Simple:

She also has some (it looks) customized stuff which I haven't gotten to yet but will post about when I get there.
This is a screenshot of Please Make a Note.

Tony also has a very nice layout. Good font, background contrast. Very readable. He also has some nice customized stuff. I also noticed his tab at the top on the internet browser has a blue sphere instead of the Blogger emblem. Got to figure out that trick!!
Well, I just found the adjust width tab under the Design tab. Geez, it couldn't have been any more obvious. Haha, oh man, maybe it's new?? Anyways here are some screenshots:


Sunday, December 19, 2010
One Advantage of Ubuntu over Windows: File Naming
A quick observation here. One thing I have noticed between Ubuntu and Windows is that when naming files, I haven't (in Ubuntu) run into any problems with file length. I think the Ubuntu file name system even takes some symbols like the colon (:). Also, another small but helpful and cool thing (to me at least) is that when renaming a file, I can leave the PDF open in Foxit and rename it without any issues unlike in Windows with Adobe (it may be just an Adobe thing, I haven't checked). However, if you are sharing files with a Windows user, the Windows system can't/won't copy the files.
Wednesday, December 15, 2010
My wiki page at Zoho
I love to share information and keep a central location for everything. I decided to create a wiki page again inspired by Tony Saad. A wiki page seems like a good way to distribute a myriad of information in a website format. So instead of having to create a website from scratch a wiki page will give you a beginning format similar to Blogger. A wiki page seems to be more structure than a blog. However, after getting more into Blogger and my blog later they may be quite similar and competitive. I guess wikis are good for collaboration amongst a group or I have seen formats for educational purposes (grade school). I will post more later on differences once I come across them.
Anyways, there is a myriad of wiki host around the web that usually offer a free service. Both a wiki site and general website builder that I began with was Google's Sites. I began my site also named the same as my blog Scared to fly? But I love rocket science! At first I figured I would move on to a wiki site later, but I wanted to experiment and start a simple website/wiki which Google Sites seemed (and is) perfect. I began it by creating a simple about me, listing interest, education, and publications. In hindsight, I am glad I kept the site (I thought I had deleted it!) because after working with Blogger some more (Sites is obviously based on the same format) Sites seems to be just as good as any other wiki, that I have noticed so far.
A screenshot:

After experimenting with Google Sites, I first tried out Wikispaces but was not impressed by, IMO, the limited editor (I did end up deleting this one).
Screenshots:


I then found Zoho's Wiki. Zoho is, in their words,
"Zoho provides a wide, integrated portfolio of rich online applications for businesses. With more than 20 different applications spanning Collaboration , Business and Productivity applications, Zoho helps businesses and organizations get work done. Our applications are delivered over the internet, requiring nothing but a browser. This means you can focus on your business and rely on us to maintain the servers and keep your data safe."
They have online office apps, plus much more. I will blog on them later. I first saw Zoho from the Ubuntu repositories.
Anyways, I really like Zoho Wiki so far, and it looks very robust. I also named this one Hate to fly? But I love rocket science! I am keeping both a blog and the website, and I will update the differences/advantages of both.
Here is a screenshot:


Finally, my friend and mentor, Tony Saad, uses Wikidot for his wiki page Science Talk or SciTlk.
Some screenshots:


Anyways, there is a myriad of wiki host around the web that usually offer a free service. Both a wiki site and general website builder that I began with was Google's Sites. I began my site also named the same as my blog Scared to fly? But I love rocket science! At first I figured I would move on to a wiki site later, but I wanted to experiment and start a simple website/wiki which Google Sites seemed (and is) perfect. I began it by creating a simple about me, listing interest, education, and publications. In hindsight, I am glad I kept the site (I thought I had deleted it!) because after working with Blogger some more (Sites is obviously based on the same format) Sites seems to be just as good as any other wiki, that I have noticed so far.
A screenshot:

After experimenting with Google Sites, I first tried out Wikispaces but was not impressed by, IMO, the limited editor (I did end up deleting this one).
Screenshots:


I then found Zoho's Wiki. Zoho is, in their words,
"Zoho provides a wide, integrated portfolio of rich online applications for businesses. With more than 20 different applications spanning Collaboration , Business and Productivity applications, Zoho helps businesses and organizations get work done. Our applications are delivered over the internet, requiring nothing but a browser. This means you can focus on your business and rely on us to maintain the servers and keep your data safe."
They have online office apps, plus much more. I will blog on them later. I first saw Zoho from the Ubuntu repositories.
Anyways, I really like Zoho Wiki so far, and it looks very robust. I also named this one Hate to fly? But I love rocket science! I am keeping both a blog and the website, and I will update the differences/advantages of both.
Here is a screenshot:


Finally, my friend and mentor, Tony Saad, uses Wikidot for his wiki page Science Talk or SciTlk.
Some screenshots:


Sunday, December 12, 2010
RSS Feeds for Facebook and Twitter
This is kind of random, but I wanted my Facebook status updates to link to my Twitter account. There is a Facebook app that does Twitter to Facebook, but not the other way around. I search the Facebook apps and found Twitter Feed which allows for blog or any other RSS feed to post to Twitter and/or Facebook. I then found how to do your status updates in Facebook as an RSS feed here:
Hacking Facebook Status Updates Into RSS Feeds
I now have my blog post updates and Facebook status updates linked to my Twitter!! Cool! You can also make RSS feeds for notifications and friend updates, etc.
I will blog more later on RSS feeds and Twitter Feed with images.
Hacking Facebook Status Updates Into RSS Feeds
I now have my blog post updates and Facebook status updates linked to my Twitter!! Cool! You can also make RSS feeds for notifications and friend updates, etc.
I will blog more later on RSS feeds and Twitter Feed with images.
LaTeX Curriculum Vitae (CV) Template
I will post here any LaTeX CV templates that I come across surfing the web.
From Jason R. Blevins
http://jblevins.org/projects/cv-template/
From Ted Pavlic
http://www.tedpavlic.com/post_resume_cv_latex_example.php
From Jason R. Blevins
http://jblevins.org/projects/cv-template/
From Ted Pavlic
http://www.tedpavlic.com/post_resume_cv_latex_example.php
LaTeX Line and Page Breaking
I did not write any of this by the way. I have only reposted from the following site:
did not write any of this by the way. I have only reposted from the following site:
LaTeX Line and Page Breaking
The first thing LaTeX does when processing ordinary text is to translate your input file into a string of glyphs and spaces. To produce a printed document, this string must be broken into lines, and these lines must be broken into pages. In some environments, you do the line breaking yourself with the \\ command, but LaTeX usually does it for you. The available commands are
\\ start a new paragraph.
\\* start a new line but not a new paragraph.
\- OK to hyphenate a word here.
\cleardoublepage flush all material and start a new page, start new odd numbered page.
\clearpage plush all material and start a new page.
\hyphenation enter a sequence pf exceptional hyphenations.
\linebreak allow to break the line here.
\newline request a new line.
\newpage request a new page.
\nolinebreak no line break should happen here.
\nopagebreak no page break should happen here.
\pagebreak encourage page break.
\\
\\[*][extra-space]
The \\ command tells LaTeX to start a new line. It has an optional argument, extra-space, that specifies how much extra vertical space is to be inserted before the next line. This can be a negative amount. The \\* command is the same as the ordinary \\ command except that it tells LaTeX not to start a new page after the line.
\-
The \- command tells LaTeX that it may hyphenate the word at that point. LaTeX is very good at hyphenating, and it will usually find all correct hyphenation points. The \- command is used for the exceptional cases, as e.g.
man\-u\-script
\cleardoublepage
The \cleardoublepage command ends the current page and causes all figures and tables that have so far appeared in the input to be printed. In a two-sided printing style, it also makes the next page a right-hand (odd-numbered) page, producing a blank page if necessary.
\clearpage
The \clearpage command ends the current page and causes all figures and tables that have so far appeared in the input to be printed.
\hyphenation
\hyphenation{words}
The \hyphenation command declares allowed hyphenation points, where words is a list of words, separated by spaces, in which each hyphenation point is indicated by a - character, e.g.
\hyphenation{man-u-script man-u-stripts ap-pen-dix}
\linebreak
\linebreak[number]
The \linebreak command tells LaTeX to break the current line at the point of the command. With the optional argument, number, you can convert the \linebreak command from a demand to a request. The number must be a number from 0 to 4. The higher the number, the more insistent the request is.The \linebreak command causes LaTeX to stretch the line so it extends to the right margin.
\newline
The \newline command breaks the line right where it is. The \newline command can be used only in paragraph mode.
\newpage
The \newpage command ends the current page.
\nolinebreak
\nolinebreak[number]
The \nolinebreak command prevents LaTeX from breaking the current line at the point of the command. With the optional argument, number, you can convert the \nolinebreak command from a demand to a request. The number must be a number from 0 to 4. The higher the number, the more insistent the request is.
\nopagebreak
\nopagebreak[number]
The \nopagebreak command prevents LaTeX form breaking the current page at the point of the command. With the optional argument, number, you can convert the \nopagebreak command from a demand to a request. The number must be a number from 0 to 4. The higher the number, the more insistent the request is.
\pagebreak
\pagebreak[number]
The \pagebreak command tells LaTeX to break the current page at the point of the command. With the optional argument, number, you can convert the \pagebreak command from a demand to a request. The number must be a number from 0 to 4. The higher the number, the more insistent the request is.
did not write any of this by the way. I have only reposted from the following site:
LaTeX Line and Page Breaking
The first thing LaTeX does when processing ordinary text is to translate your input file into a string of glyphs and spaces. To produce a printed document, this string must be broken into lines, and these lines must be broken into pages. In some environments, you do the line breaking yourself with the \\ command, but LaTeX usually does it for you. The available commands are
\\ start a new paragraph.
\\* start a new line but not a new paragraph.
\- OK to hyphenate a word here.
\cleardoublepage flush all material and start a new page, start new odd numbered page.
\clearpage plush all material and start a new page.
\hyphenation enter a sequence pf exceptional hyphenations.
\linebreak allow to break the line here.
\newline request a new line.
\newpage request a new page.
\nolinebreak no line break should happen here.
\nopagebreak no page break should happen here.
\pagebreak encourage page break.
\\
\\[*][extra-space]
The \\ command tells LaTeX to start a new line. It has an optional argument, extra-space, that specifies how much extra vertical space is to be inserted before the next line. This can be a negative amount. The \\* command is the same as the ordinary \\ command except that it tells LaTeX not to start a new page after the line.
\-
The \- command tells LaTeX that it may hyphenate the word at that point. LaTeX is very good at hyphenating, and it will usually find all correct hyphenation points. The \- command is used for the exceptional cases, as e.g.
man\-u\-script
\cleardoublepage
The \cleardoublepage command ends the current page and causes all figures and tables that have so far appeared in the input to be printed. In a two-sided printing style, it also makes the next page a right-hand (odd-numbered) page, producing a blank page if necessary.
\clearpage
The \clearpage command ends the current page and causes all figures and tables that have so far appeared in the input to be printed.
\hyphenation
\hyphenation{words}
The \hyphenation command declares allowed hyphenation points, where words is a list of words, separated by spaces, in which each hyphenation point is indicated by a - character, e.g.
\hyphenation{man-u-script man-u-stripts ap-pen-dix}
\linebreak
\linebreak[number]
The \linebreak command tells LaTeX to break the current line at the point of the command. With the optional argument, number, you can convert the \linebreak command from a demand to a request. The number must be a number from 0 to 4. The higher the number, the more insistent the request is.The \linebreak command causes LaTeX to stretch the line so it extends to the right margin.
\newline
The \newline command breaks the line right where it is. The \newline command can be used only in paragraph mode.
\newpage
The \newpage command ends the current page.
\nolinebreak
\nolinebreak[number]
The \nolinebreak command prevents LaTeX from breaking the current line at the point of the command. With the optional argument, number, you can convert the \nolinebreak command from a demand to a request. The number must be a number from 0 to 4. The higher the number, the more insistent the request is.
\nopagebreak
\nopagebreak[number]
The \nopagebreak command prevents LaTeX form breaking the current page at the point of the command. With the optional argument, number, you can convert the \nopagebreak command from a demand to a request. The number must be a number from 0 to 4. The higher the number, the more insistent the request is.
\pagebreak
\pagebreak[number]
The \pagebreak command tells LaTeX to break the current page at the point of the command. With the optional argument, number, you can convert the \pagebreak command from a demand to a request. The number must be a number from 0 to 4. The higher the number, the more insistent the request is.
Saturday, December 11, 2010
Inkscape and Tex Text
I have found for Ubuntu the best software for drawing figures for research is Inkscape. It is cross platform which is a big bonus, and of course it is free! It is also found in the Ubuntu software repositories.


I wanted a vector graphics drawing program vs a raster graphics program which essentially means that the quality of the image holds up when zoomed in (aka no pixel-ation). Please see the Wikipedia article link and image below.
Vector graphics (From Wikipedia, the free encyclopedia)

Another big requirement for me is that the drawing software should be able to handle equation input easily and quickly since I work a lot with math in my research. Inkscape does this flawlessly and uses LaTex math input!! However, there are two ways to go about this. The first is using the built in InkLaTeX (see InkLaTeX - Extensions for drawing LaTeX text on Inkscape for more info).


Unfortunately, the formula cannot be re-edited if need be. However, the second option allows this and is what I recommend. It is using Textext in Inkscape. To install simply download the files: textext.inx and textext.py. Then, depending on what version of Ubuntu you are using the files will go into ~/.config/inkscape/extensions/ for Inkscape 0.47 versions or later (the ~/.config folder can be found in your homefolder and will be named what ever you called it; mine for example is timbarber/.config since that is my login name; you will also have to click on "Show Hidden Files" under the View menu) and in ~/.inkscape/extensions/ for earlier versions. Also for Linux installations some additional requirements are: (see Textext for additional platform installation help as well; I do not know why these are needed either)
On Linux, you’ll need to have pdflatex and one of the following installed:
- Pstoedit with its plot-svg back-end compiled in, or,
- Pstoedit and Skconvert, or,
- Pdf2svg (the one by David Barton & Matthew Flaschen, not the one by PDFtron)
I think you can get all this done under the Ubuntu repositories for the Inkscape installation (see next image).

Once installed simply go to Extensions and there should be a separate Tex Text file.

The next few images is an example of inserting an equation and editing it. Simply click the equation image and select Extensions->;Text Text again. If an error or warning pops up like I have shown, I am not sure why or what it is for but just click "Ok" and everything should be fine.


For additional information please also see this blog post:
The Typethinker
Trying to make sense
Integrating Inkscape graphics in LaTeX
and this website:
LaTeX in Inkscape
jblevins.org » log » latex-in-inkscape
CHAPEL HILL, DECEMBER 10, 2007
by Jason R. Blevins
ASSISTANT PROFESSOR OF ECONOMICS AT THE OHIO STATE UNIVERSITY


I wanted a vector graphics drawing program vs a raster graphics program which essentially means that the quality of the image holds up when zoomed in (aka no pixel-ation). Please see the Wikipedia article link and image below.
Vector graphics (From Wikipedia, the free encyclopedia)
Another big requirement for me is that the drawing software should be able to handle equation input easily and quickly since I work a lot with math in my research. Inkscape does this flawlessly and uses LaTex math input!! However, there are two ways to go about this. The first is using the built in InkLaTeX (see InkLaTeX - Extensions for drawing LaTeX text on Inkscape for more info).


Unfortunately, the formula cannot be re-edited if need be. However, the second option allows this and is what I recommend. It is using Textext in Inkscape. To install simply download the files: textext.inx and textext.py. Then, depending on what version of Ubuntu you are using the files will go into ~/.config/inkscape/extensions/ for Inkscape 0.47 versions or later (the ~/.config folder can be found in your homefolder and will be named what ever you called it; mine for example is timbarber/.config since that is my login name; you will also have to click on "Show Hidden Files" under the View menu) and in ~/.inkscape/extensions/ for earlier versions. Also for Linux installations some additional requirements are: (see Textext for additional platform installation help as well; I do not know why these are needed either)
On Linux, you’ll need to have pdflatex and one of the following installed:
- Pstoedit with its plot-svg back-end compiled in, or,
- Pstoedit and Skconvert, or,
- Pdf2svg (the one by David Barton & Matthew Flaschen, not the one by PDFtron)
I think you can get all this done under the Ubuntu repositories for the Inkscape installation (see next image).

Once installed simply go to Extensions and there should be a separate Tex Text file.

The next few images is an example of inserting an equation and editing it. Simply click the equation image and select Extensions->;Text Text again. If an error or warning pops up like I have shown, I am not sure why or what it is for but just click "Ok" and everything should be fine.


For additional information please also see this blog post:
The Typethinker
Trying to make sense
Integrating Inkscape graphics in LaTeX
and this website:
LaTeX in Inkscape
jblevins.org » log » latex-in-inkscape
CHAPEL HILL, DECEMBER 10, 2007
by Jason R. Blevins
ASSISTANT PROFESSOR OF ECONOMICS AT THE OHIO STATE UNIVERSITY
Subscribe to:
Posts (Atom)